 High-fidelity N scale electric modeling made a rather auspicious appearance in the August 2019 edition of Railroad Model Craftsman. The monthly RMC/Dremel Kitbashing Award went to Bryan Busséy's excellent New Haven EP-3 model. The model is exemplary: it is a zero-compromise representation of this steam-era electric box cab, notably reproducing the gnarly, steampunk-ish running gear and end porches. Bryan also posted this video of his EP-3 in motion:
Showing posts with label Rolling Stock. Show all posts
Showing posts with label Rolling Stock. Show all posts
Monday, August 26, 2019
N Scale Electric Scratchbashing in Railroad Model Craftsman
High-fidelity N scale electric modeling made a rather auspicious appearance in the August 2019 edition of Railroad Model Craftsman. The monthly RMC/Dremel Kitbashing Award went to Bryan Busséy's excellent New Haven EP-3 model. The model is exemplary: it is a zero-compromise representation of this steam-era electric box cab, notably reproducing the gnarly, steampunk-ish running gear and end porches. Bryan also posted this video of his EP-3 in motion:Monday, April 29, 2019
Finished Island Model Works Silverliners Spotted in the Wild
 |
I nearly spit out my decaf when this stunning photo graced the top of a recent Model Railroad Hobbyist blast email. The models and photos are the work of Tim Nicholson. The modeling alone caught my eye: the colors and textures alone capture the look and feel of the Northeast Corridor in late spring or summer. Then I realized I was looking at an electric MU car under wire! Woo hoo! Photo and models courtesy of Tim Nicholson and Model Railroad Hobbyist.
|
 |
There's a lot of great modeling going on in Tim's deceptively simple vignettes. In addition to doing a bang-up job with a tough Island Model Works kit--the lights and the little details like wipers, marker lights, hoses, safety chains, of which modern passenger equipment seem to be full--the right-of-way and structures show remarkable craftsmanship. Details to look out for in this photo: concrete detail, station windows, and joint bars. Photo and models courtesy of Tim Nicholson and Model Railroad Hobbyist.
|
 |
| And those poles and that wire. Notice the fine gauge wire, and the compound catenary (the prototypically correct double contact wire). The cantilever poles and insulators are also prototypically proportioned. Hoping to see more of Tim's work! |
Saturday, March 16, 2019
Catching the White Whale: Amtrak ICE Trainset
It does have a few quirks. As noted by the encyclopedically tireless tester of all N scale locomotives, Spookshow, it has some tricky close couplings, which turn out to be simple drawbars with NEM coupler plugs and sockets.
Its early 90s production also predates 'DCC ready', so DCC installation will be either old school with lots of soldering and whatnot, or expensive, as Fleischmann's recommended DCC conversion is to remove the Amtrak ICE shells and install them on the drives for a separately offered equipped ICE loco set. That DCC-equipped ICE loco set, is, of course, even rarer than this ICE Amtrak set and usually fetches an even higher premium price. Nonetheless, glad to have this prize running on the Old Line Corridor.
Monday, January 28, 2019
What’s Happening on the Old Line Corridor, January 2019 Edition
 |
| Smells like team spirit: Operation Lifesaver is in the house--this Conrail Operation Lifesaver GP15-1 was a gift to my wife, Rachel, who is Operation Lifesaver's national Executive Director. Finally got a DCC decoder into this gem of a model over a recent weekend so it can run on the Old Line Corridor layout. |
 |
| A tiring chore completed: this sound-equipped Bachmann GG1 in Congressional Silver threw a traction tire, which needed to be replaced. Traction tires are an unfortunate fact of life in N scale. Can't live with 'em because they interrupt good pickup and make rerailing a hassle, can't live without 'em because when they inevitably come off, the wheels are won't track or roll well because of the big ol' groove in the wheel profile. The model required complete disassembly to replace that one errant traction tire. This problem also afflicts Kato's otherwise excellent GG1 model as well. Would that some aftermarket manufacturer devise some ingenious method of replacing traction tires permanently with solid metal tires. |
 |
| And a fun structure build: this Walthers farm equipment supplier kit fits together especially well and is well engineered, unlike Walthers massive papermill kit which suffers thin, flimsy, translucent walls and confounding windows. Walthers could improve the instructions for all its current structure kits. |
Saturday, December 22, 2018
Launching a T-Trak Side Quest
 |
| This single T-Trak module is the most basic and original building block of the T-Trak table top N scale module concept. Note the line of holes for attaching Kato Unitrack, which is an integral element of the T-Trak standard. The module bases shown here were constructed from Masterpiece Modules kits, each of which comprise nine CNC router-cut 1/4" Baltic birch parts. The precision-cut parts fit together like 3-D puzzle pieces; carpenter's wood glue is applied to the mating surfaces. Per the instructions, gentle hammer taps moderated by a block of scrap wood ensure the precisely milled tabs fully seat and form square, super strong joints. The resulting module boxes are extremely rigid and sturdy. |
As we have contemplated new living arrangements, possibly with multiple smaller homes while we transition between full-time work and retirement, Rachel has thoughtfully raised concern about how I can continue my modeling in smaller, transitory spaces.
I'm also thinking of ways to satisfy multiple different modeling interests. As mentioned here previously, I still have an abiding interest in modeling the prototypes of my home region of Northwest Indiana, as well as burgeoning new interests in European prototype modeling.
 |
| An Operation Lifesaver T-Trak single module concept. Will look awesome on Rachel's desk! |
Yet another project I have in mind is to modestly contribute to and support Rachel's new professional role as a railroad industry safety leader via my modeling. Put another way--she needs relevant railroad models for her desk and her rail industry events!
And I'm finding the fellowship of model railroading increasingly rewarding. I have uncovered the model railroad social scene in Washington DC area, and was pleased to find that we have a vibrant N scale modular model railroading scene, focused on the Ntrak and T-Trak standards.
T-Trak modular model railroading in particular offers a promising approach to meet these portability, versatility, and fellowship needs. To give the approach a test drive, I recently took the plunge and ordered T-Trak module base kits from Masterpiece Modules.
These kits are ingeniously engineered and produced, and were a delight to build--each went together in less than 30 minutes each with only sandpaper, carpenter's wood glue, a hammer, and a wood block. For future efforts, I may learn and use makerspace tools--such as laser cutters and CNC routers--to make modules and other benchwork of my own design.
In addition to an Operation Lifesaver module, I have in mind at least one Northwest Indiana-themed module, and also a European module. The Euro module is very likely to be a long quad, so I can build out a run of Sommerfeldt or Viessmann catenary.
Stay tuned for more on my T-Trak side quest.
Stay tuned for more on my T-Trak side quest.
 |
| A double T-Trak module--same number of parts, just differently sized. The ÖBB (Austrian state railways) Vectron loco is positioned over the row of Unitrack mounting holes to give a sense of proportion. If you were thinking, "that loco looks familiar yet more interesting," that because the four-pantographed ÖBB Vectron is the sexier Austrian cousin of Amtrak's ACS-64 Cities Sprinter. This Fleischmann model has excellent lighting and running characteristics, which I fully leveraged by using a ESU LokPilot 4.0 decoder with an Next18 plug. |
 |
| Rear view of a quad T-Trak module. Note the small round holes intended for mounting the backdrop ('skyboard' in T-Trak parlance) and the large square holes for passing through wiring. This module will likely be German- or Austrian-themed, with a run of either Sommerfeldt or Viessmann catenary. I’m thinking a Rhine cliffs or similar theme. |
 |
| What's underneath: not much. The front, ends, and top fit together very tightly and squarely. Those corner gussets add more strength and are fitted with T-nuts for threaded ‘legs’ that allow for adjustment to uneven tabletop surfaces. Am wondering whether I should screw in more bracing to minimize twisting or torsion, but I suspect that would be overkill on an already excessively sturdy and overbuilt design. |
Monday, November 26, 2018
Just Because
Rode this in Canada when I was 10 or 11, and Rapido did it right in N scale. Thanks Jason Shron, and company, this one hits the spot.
Monday, November 5, 2018
N Scale Toaster Update
 |
| The basis of the N scale AEM-7--'Toaster'--project is Fleischmann's Rc4 model, and the first challenge was couplers. On the left, the Rc4 has been fitted with a Bachmann EZ Mate coupler; on the right, the Rc4 fitted with a Dapol magnetic coupler. The Dapol coupler is intended to be a substitute for Rapido couplers on buffer-equipped UK and continental European rolling stock. As a result, the Dapol couplers sit low, and are roughly the same volume and reach as Rapido couplers in the foreground; note the height in comparison. In short, the Dapols will not mate with the MicroTrains/Kato/Accumate/EZ Mate knuckle couplers that are more or less standard on US N scale rolling stock. I had hoped the Dapols would work on the Rc4s, but alas, I devised a method for attaching the shank of a Bachmann EZ Mate coupler to the shank of the stock Rapido couplers. I am surprised that MicroTrains has not introduced an appropriately shanked coupler that fits in the NEM standard socket common to many contemporary European N models. |
 |
| Getting ready for prime time: over in the paint shop, the Shapeways/Imperial AEM-7 shells have received a coat of GSI/Creos Mr. Surfacer. Note that the bottom half of the loco's pilots have been removed to accomodate the truck-mounted couplers. The coat of paint revealed prominent stratification and other artifacts of the 3D printing process. I anticipate that several coats of Mr. Surfacer, with careful sanding and polishing in between coats, will be required before they are ready for finishing in Amtrak colors. One will get an as-delivered Phase III paint scheme; the other will be finished in the Phase V scheme, which these Toasters wore at the time of their retirement. |
 |
| Fleischmann Rc4 frame modifications in progress. On the left, the exposed silver metal indicates where the frame has been filed to fit the Shapeways/Imperial AEM-7 shell. On the right, note the installed TCS EUN651P-18 decoder; this is apparently the only US market decoder that fits in this model. |
Monday, October 1, 2018
Calumet Region N Scale Models: The Long View
 |
| On the bench: Island Model Works/Shapeways South Shore/NICTD Nippon Sharyo body shell (buy it here). A quick test shows it will fit on the Kato RDC drive with a bit of of judicious filing and fiddling. Will need some Faively-style pantographs and some decal-bashing in addition to silver paint and window glazing. |
Walthers updated and re-ran its N SW1200 earlier this year, and offered it in two different Calumet Region paint schemes: Indiana Harbor Belt and Elgin Joliet and Erie. I picked up the IHB version, and would pick up another road number and even the EJ&E version if one presented itself. The SW is a fine loco, but its DCC decoder installation is quite fussy owing to very tricky disassembly that can result in mangling vital pickup wipers. The IHB SW is an excellent complement to Bluford's IHB transfer caboose, two of which I also acquired.
Another N surprise turned up on the Island Model Works store on Shapeways, which is a South Shore/NICTD Nippon Sharyo coach shell. The actual Shapeways item is inexplicably called 'Nss Single 12-2016' but it is unmistakably a South Shore stainless steel coach. It appears to be scaled down from IMW's HO resin offering of this same car, construction of which has been covered here previously on Up Dunes Junction. A test fitting suggests the shell will fit with some fiddling and grinding over the Kato RDC drive. In particular, the interior features posts that extend from the roof down to a few millimeters or so shy of the of side bottom, suggesting it would fit on to a conventional floor as on the IMW HO version of this car. To fit on the thick Kato RDC drive, these interior posts will need to be shortened by another few millimeters.
 |
| Bluford IHB transfer caboose and Walthers IHB SW1200. The decoder install in the SW is a tight, difficult fit, but it is a good runner, no small feat in such a small, light locomotive. |
 |
| The RSM Grasselli kit, based on an iconic Indiana prototype. |
Readers may be wondering: don't I already have an HO South Shore layout? The whole point of my N scale sojourn and Old Line Corridor has been modeling Northeast Corridor prototypes that have been impractical to cover in HO, so why all the fuss over N scale models of Calumet Region prototypes?
For the moment, my focus will remain on NEC prototypes in N and Calumet Region, including the South Shore--in HO. But I'm thinking ahead to my future model railroading, where I anticipate time and resources for model railroading but maybe somewhat less space or more transitory space. My spouse and I are eyeballing our possible (retired) future without a large house--or even living between multiple smaller houses.
In other words, a portable, space-conscious approach to model railroading is likely to be in my future, perhaps even modular model railroading using the T-Trak, N-Trak, or Free-Mo standard. The modular approach would give me an opportunity to build some Calumet Region layout design elements, and provide an appropriate venue for running Calumet Region equipment.
Fortunately, I live in prime N scale module territory: our excellent local Northern Virginia NTrak (NVNTrak) club has both NTrak and T-Trak divisions. I'm looking forward to getting to know the NVNTrak gang in the future, and modeling my favorite Calumet Region railroads.
Monday, September 10, 2018
Odds and Ends Around the Old Line Corridor
 |
| I originally built a Piko (also Con-Cor) substation for the OLC, but it just didn't have the distinctive lines or towering bulk of NEC substations. The maker of OLC's catenary towers, DesignDyne/Shapeways, produced this N scale substation. Look for an upcoming post on the substation. |
 |
| This kitbashed highway overpass was made from a couple of Rix overpass kits, with piers fabricated from Evergreen styrene strips. The overpass and the paper plant form a kind visual block to break up the curve at this end of the layout. Looking forward to scenicking the overpass and the paper plant into the layout. |
 |
| Designdyne/Shapeways four-track catenary bridges finally installed over the 'visible staging' yard. I wanted to run trains around the OLC and couldn't do so with the catenary bridges not yet mounted with magnets--they kept tipping over on to the tracks. Hey, is that an Indiana Harbor Belt SW between Amtrak trains on the NEC? Look for a an upcoming post on the Northwest Indiana trains that keep turning up in N scale and thence on the OLC... |
 |
| One of those formed plastic throttle pockets turned up on the clearance rack at MB Klein's, so I bought it for my ESU Mobile Control II. I mounted it on the front of the OLC layout, with the result that now every time I walk by it, I just start running trains. |
Sunday, April 3, 2016
N Scale Toaster Project Pieces 'n' Parts
A contemporary Northeast Corridor roster would not be complete without an AEM-7, also known as a 'Toaster'. I'm in another intense period of business travel, which has been cutting into my modeling time, but one of the many joys of arriving home is catching up with the model train packages that arrived in my absence. Some key N scale AEM-7 pieces and parts came my way this week.
 |
| Prototype AEM-7s were built by EMD based on the Swedish ASEA Rc4 electric locomotive design, so a fitting start to the N scale Toaster project is a proven Rc4 locomotive model. This Fleischmann model (#736503) is an Austrian State Railways Class 1043, which is the European export version of the Rc4. The model is equipped with a European NEM DCC socket, heavy frame, and excellent drive, and the single-arm pantographs are similar to the AEM-7's and can thus be re-used for this project. In short, the Fleischmann model will be an excellent foundation for the N scale Toaster project. |
 |
| This Imperial Hobby Productions AEM-7 shell and parts printed by Shapeways is the other key component of the N scale Toaster project. The parts are crisply detailed and sturdy, and the fit to the Fleischmann Rc4 seems very close at first blush. The shell and parts represent an early or 'as delivered' AEM-7, appropriate for 1980s and 90s. A more recent or rebuilt AEM-7 would also have recessed ditch lights on the nose between the pilot and windshield, number panels on the sides, as well as some additional frippery on the roof. I'm excited to get this shell prepped and primed! |
Sunday, March 6, 2016
The Old Line Corridor Horsetrade
 |
| Fussy pans that made my catenary building better |
 |
| That vestigial micro pan worked like buttah! |
 |
| Excellent runner and captain of the catenary testing team |
 |
| This guy was a growler |
 |
| An unsung hero of a model: excellent runner done right, but apparently Bachmann couldn't give 'em away. |
So I put all of my HO NEC gear up on eBay. I also liquidated my collection of unbuilt rare Star Wars kits also destined for closet glory. The result was a tidy PayPal nut that covered not only new a N scale Pennsy/NEC fleet but also a supply of Peco code 55 track and turnouts.
 |
| Dogs and cats, living together, mass hysteria: N scale Northeast Corridor equipment, living side by side with my HO South Shore and Chicagoland equipment. The Kato ACS-64 and the GG-1s are especially fine models, but the Acela will be an, ahem, project. Bonus points if you can identify the sci-fi subjects on the edges of the photo. |
Tinkering with these models--installing DCC, couplers, and the like--was intimidating at first, but it didn't take long to get accustomed to the smallness, nay, the tininess of it all. The power and appeal of these models really came across during test runs and programming. I am now looking forward to building the layout on which to run these models.
Friday, May 8, 2015
American Electrics: South Shore 700-Class Boxcab
 |
| "19660529 09 South Shore Line 703 @ Michigan City Shops" by David Wilson - Flickr: 19660529 09 South Shore Line #703 @ Michigan City Shops. Licensed under CC BY 2.0 via Wikimedia Commons. |
The 700s were the other hand-me-down freight engines in the final years of electric freight operations on the South Shore. They began life on the New York Central as R-2s, where they drew power from 660VDC third rail in the tunnels and suburban lines around New York City. Diesels were able to work the tunnels in NY, thus saving the NYC time and money by eliminating the need for engine changes. South Shore picked up seven R-2s between 1955 and 1967, added pantographs, changed other carbody appurtenances, and rewired them for 1500VDC operations.
 |
| Nickel Plate Products CSS&SB 700 in HO. |
Nickel Plate Products imported a Japanese model of the 700 in brass in HO during the mid 1970s. It is a notoriously bad runner with a tendency to crack its gears. Its minimum track radius of 22" is somewhat surprising, given the model's short overall length and wheelbase. The pantographs are also typical 1970s fare--not intended to actually contact wire, barely stay retracted/folded, and look not quite right. The small 'footprint' of pantographs may necessitate actually scratchbuilding replacements. Still, it's a beautiful, chunky model with a lot of butch, gnarly detail. I have one in my collection, and I plan to eventually re-work its drive, install DCC and lighting, and paint it. Maybe another will come along to join the Dunes Junction roster.
Friday, May 1, 2015
Pantograph Mounts for Old-Style South Shore Coaches
 |
| Evergreen styrene strips, rod, and square tubing, plus some insulators from the scrap box make up the mounts for the ConCor pantographs. |
 |
| The whole shebang, ready to be place back on its floor. |
Friday, April 24, 2015
Surfacing Primer on the IHP Nippon Sharyo Car
 |
| The IHP Nippon Sharyo Body with a light coat of Tamiya Surfacing Primer. This will help show flaws that need filling and correction; will let it dry for a week or so. Body details such as grab irons, bells, and ditch lights go on after any corrective action, and body will get another coat of primer. |
Tuesday, April 21, 2015
The International House of Pantographs
 |
| International House of Pantographs: If you spend enough time around HO heavy electrics, you might end up with a motley crew of pantographs like this. Most of these are Sommerfeldts from Germany but there're others in there, salvaged from old heavy electric models or acquired outright for various projects. Modern single-arms tend to look okay for North American prototype models, but some of those old-fashioned diamonds on the right side of the picture really look foreign. |
 |
| Must look good folded: this is a modified Con-Cor MP54 pantograph. These are swell-looking pantographs, in either the up or down position. The photo-etched arms are especially well-done. The very well detailed base, which is very accurate for the MP54, has been removed via a very scary unsoldering process. The insulator and bottom support beams are lovely and large lost wax brass castings that absorbed all the heat my best 60-watt soldering iron could produce, thus a very uncontrollable and imprecise process. I've since acquired a resistance soldering rig for 'next time'. Will now fabricate a new base and insulators to complete the South Shore look. Did I mention it looks good folded? |
 |
| One up and one down. New bases will be fabricated from styrene, or of I'm feeling frisky, from brass. |
Friday, April 10, 2015
Further Notes on Brass Remotoring and Customer Service
 |
| Hollywood Foundries Bull Ant drive and TCS KAT22 decoder fitted to floor of NPP South Shore Combine |
Hollywood Foundries serves up the Bull Ant in a nearly infinite number of combinations of mounts, wheel size, wheel profile, wheelbase, gauge, motor size, and wiring. The Bull Ant is an above-the-floor design that uses Mashima can motors.
Hollywood Foundries is run by Geoff Baxter amd is located in Australia, but don't let the distance fool you. The Hollywood web site has an exemplary interface for ordering the customizable Bull Ant and other products, and the e-commerce transaction is a breeze. Geoff is extremely helpful and responsive if you have any questions or concerns about Hollywood's products or your order. My drive took about three weeks to arrive, and Geoff was extremely accommodating about a last minute change to my order.
My initial attraction to the Bull Ant was that it has a flywheel and decent-sized motor, and is also very ruggedly engineered. Also, the mounting appeared to be somewhat more elegant than the raised floor mounts required by the NWSL Stanton Drive.
I ordered mine with a 37mm 'end mount'; technically, it's probably a cantilever. Mounting was very simple: I located and drilled two 2mm holes in the in the center sill of of the car and the Bull Ant's nickel silver end mount and used the included 2mm screws and nuts to fasten to the drive to the floor. A bit of .030" styrene sheet between the end mount and the car floor ensured that the car sat level.
After following Hollywood's run-in instructions, I attached the truck sideframes to the Bull Ant with epoxy. Next time, I will use styrene blocks to build out the Bull Ant's sideframe mounting surface to give the sideframe more mounting surface.
A TCS KAT22 decoder was wired in and programmed.
In comparison to my Stanton-equipped NPP cars, the Bull Ant-equipped South Shore car is noticeably noiser, owing to the gears and location of the larger motor. Side-by-side with the Stanton, the performance is comparable, save for the gear noise of the Bull Ant. The flywheel does impart some smoothness to starts and stops, but it's so small that it does not help the model glide through dead frogs or dirty track, the way old All-Nation and Hobbytown flywheel drives did back in the day.
Meanwhile, I had concerns about the performance I was getting from my earlier Stanton re-motoring projects. I had heard and seen that Stantons ran smoothly, but both of mine were troublesome. I posted some queries to a couple of the Yahoo traction groups, and got more confirmation that I should expect smooth performance from the Stantons. A proper break-in was miraculous for one of my Stantons, but the other had a hitch in its get-along.
During the discussion I initiated on the topic of Stanton Drives on the Yahoo forums, NWSL honcho Dave Rygmyr, the maker of Stanton Drives, joined the conversation. He invited anyone with a problem Stanton to contact him, so I did. He asked me to send him the troublesome Stanton, and it came back a week later, running flawlessly.
One of my TCS KAT22 decoders also developed a glitch, and TCS also promptly arranged to service and/or replace it.
TCS, Geoff at Hollywood, and Dave at NWSL are exemplars of customer service and quality manufacturing. It turns out they collaborate in real life--NWSL produces some components for Hollywood--so it's not surprising that they share a similar customer service orientation. They are also examples of old-school craftsmanship harnessing the power of the internet. I would never have been able to hear directly from Dave if not for internet forums, and Geoff and I would still be sending snail mail and dealing with international payment methods were it not for his excellent e-commerce interface.
All signs, I think, that model railroading is thriving in the 21st century.
Friday, March 27, 2015
On My Workbench: Thrall Coal Gondola Assembly Line
 |
| Taking a break from motors, decoders, and washers. Those are 80s era MDC Roundhouse Thrall coal gondola kits in the NORX paint scheme. The detailing is a little long in the tooth on these kits, but the reporting marks and data are right for 70s/80s-era unit trains on the South Shore. These have been renumbered with dry transfer lettering and are now in assembly. I'm looking forward to putting a string of them behind Little Joe 802--there's a great picture of an 800 dragging a unit train of these Thrall coal gondolas through Burnham yard on pp. 98-99 of Middleton's South Shore book. |
Tuesday, March 17, 2015
Brass South Shore Coach Remotoring Progress
The Nickel Plate Products South Shore modernized coach remotoring project has completed successful initial testing, including integration of a late-generation DCC decoder with 'keep alive' technology.
Adapting the NPP coach for installation of the Stanton drive required some cutting of the main floor and the vestibule floor in the body shell, and installation of a new raised floor section for mounting the drive. The Stanton's profile is 1/8" or so higher than the original NPP power truck. After cutting away enough main floor and vestibule to allow the Stanton to swing, I made a new floor section from 1/16" (.0625") brass strip, and offset it from the main floor using 2-56 screws and nuts and a stack of seven #2 washers. I also drilled new mounting holes in the main floor and and drilled and tapped new mounting holes in the body shell to ensure that the floor attaches securely to the body shell.
 |
| Side view of the new raised floor section for the Stanton drive truck. The offset is created by a 2-56 nut and a stack of seven #2 washers. The Stanton drive is in the background. |
 |
| Bottom view of the main floor showing cut to accommodate truck swing, new body mounting screws holes, and four 2-56 screws. |
The remotoring project uses a North West Shortline Stanton drive. During DC-only tests, the Stanton performed fairly well after a break-in of 30 minutes in each direction. The Stanton picks up power on all wheels, but consistently stalled on turnout frogs. One of my next steps is to install pickups on the trailing trucks will get pickups; the materials are enroute.
Meanwhile, I have been seeing increasing references to DCC decoders featuring 'stay alive' or 'keep alive' capabilities. 'Keep Alive' decoders use a capacitor to compensate for interruptions in current caused by dead frogs, dirty track, or otherwise inadequate contact. Several DCC makers are offering variations on this capability.
In addition to seeing references on the bulletin boards and Yahoo groups, Trevor Marshall mentioned the technology in his blog posts on installing DCC in an S scale doodlebug and then in an Overland S scale RS18. Trevor's motive power features sound, and the Keep Alive decoders also ensure that sound doesn't suffer any 'skips' or unprototypical interuptions.
 |
| Testing ain't pretty: the floor of the model and DCC harness resplendent in electrical and drafting tape used for temporary mounting. Once the trailing truck pickups and lights are installed, I will make permanent splices and neat and functional harness. |
Bernie Kempinski's recent post on the topic discussed how Keep Alive decoders added new enjoyment to his modeling by imparting new reliability on his Civil War-era 4-4-0 steam locos, and removing the tedium and expense of powering frogs either via switch machine/throw contacts or DCC frog juicers.
Keep Alive DCC decoders seemed almost too good to be true, but I wanted to experiment with one for the NPP South Shore coach repowering project. I acquired a Train Control Systems KAT22 decoder for this project and temporarily wired it into the model for a test. Other DCC manufacturers offer comparable DCC decoders. I ensured that my test rig wouldn't short or foul the running gear, and then got it on the track.
The results of my test of the KAT22 decoder in the South Shore car did not disappoint. The car moved smoothly at low speeds, and straight through dead frogs and patches of dirty track--all without the addition of new pickups on the currently dead trailing truck. Its overall performance on DCC vastly improved on my DC tests, which probably says more about the quality of my DC test controls than anything else.
See for yourself: check out the YouTube video below for the test of the coach under DCC control.
With DCC installation under control, I turned back to cosmetic features of this model. I added styrene mounting pads to the Stanton drive for truck side frames, and mounted new, functional pantographs to the roof. Next steps include fitting pickups to the trailing trucks and working out LED lighting.
 |
| Evergreen .060" x .250" strip cut cemented to the Stanton mounting pads with liquid styrene cement. The Stanton case is ABS and thus glue-able. |
 |
| Functional Model Memories pantographs mounted to the roof with 2mm screws. They sit a little high to my eye and some detailing will be needed for the bases--these pans are intended for a Northeast Corridor prototype that mounted with a bit of standoff from the roof. But better than no pans, or non-functioning pans! |
 |
| New pans reaching for the sky, just like they're supposed to do. |
Thursday, March 5, 2015
Getting Serious About Repowering Seventies-Era Brass
 |
| What's in that miter box? Just a rare, sentimental brass train from the seventies, soon to be hacked apart in a miter box |
I bought both of these models in 1978, when I was still in middle school in Indiana. Naturally, my parents, siblings, neighbors, friends, and parish members were positively horrified that I plunked down fifty bucks for each of these beauties. The impracticality of these models for a brand new model railroader was underscored by their unpaintedness and their poor running. These models would barely make it around my 4x7 layout without stalling or surging, and making a hamster wheel-like cacophony.
 |
| Serious remotoring gear: Digital calipers and Proxxon motor tool with drill press/ milling stand. I figured that if this rig can be hacked into an actual CNC machine tool, it might be precise enough for putting hacking and boring into rare, expensive brass model trains. |
These NPP South Shore cars need new power trucks, reliable all-wheel pickup, and significant additional weight to meet modern performance expectations. Up-to-date lighting is also a minimum requirement.
I acquired a couple of Northwest Short Line Stanton drives over the past year or so for these two old cars. Test fits of these drives over the past few days made it clear that some serious cutting and filing and hacking would be necessary to get the Stantons into the NPP cars.
Cutting and filing and hacking my beloved old brass South Shore cars.
Repowering is getting serious.
I've been anticipating this serious moment for a few months, and have been accumulating correspondingly serious accoutrements of repowering. Digital micrometers are a fixture of many repowering articles on the web, and were cheaper than I thought. I wonder now what took me so long to add this miracle tool to my workshop. Amazon, Ebay, and MicroMark have numerous different digital micrometers on offer.
A miniature drill press was another must-have repowering tool, and some milling and grinding capabilities on the side would be a bonus. My workbench space is limited, so having a separate motor tool, drill press, and mill would not be practical. I homed in on the Proxxon motor tool system. This German-made motor tool system is known for it precision and high quality, as well as its standardized collar, which makes it a favorite for the 'maker' community to adapt to homemade computer-controlled machine tools. I'm not planning to start using CNC techniques for my model railroading (not yet anyway) but the Proxxon drill press/milling stand uses this unique collar for to transform the Proxxon motor tool into an extremely stable, precise, and versatile machine tool. It is also extremely quiet. My Proxxon rig came from Amazon.
The micrometer and the Proxxon rig are helping do more precise work, but they still haven't made it any easier to cut, drill, and hack a beloved old brass train.
Thursday, January 15, 2015
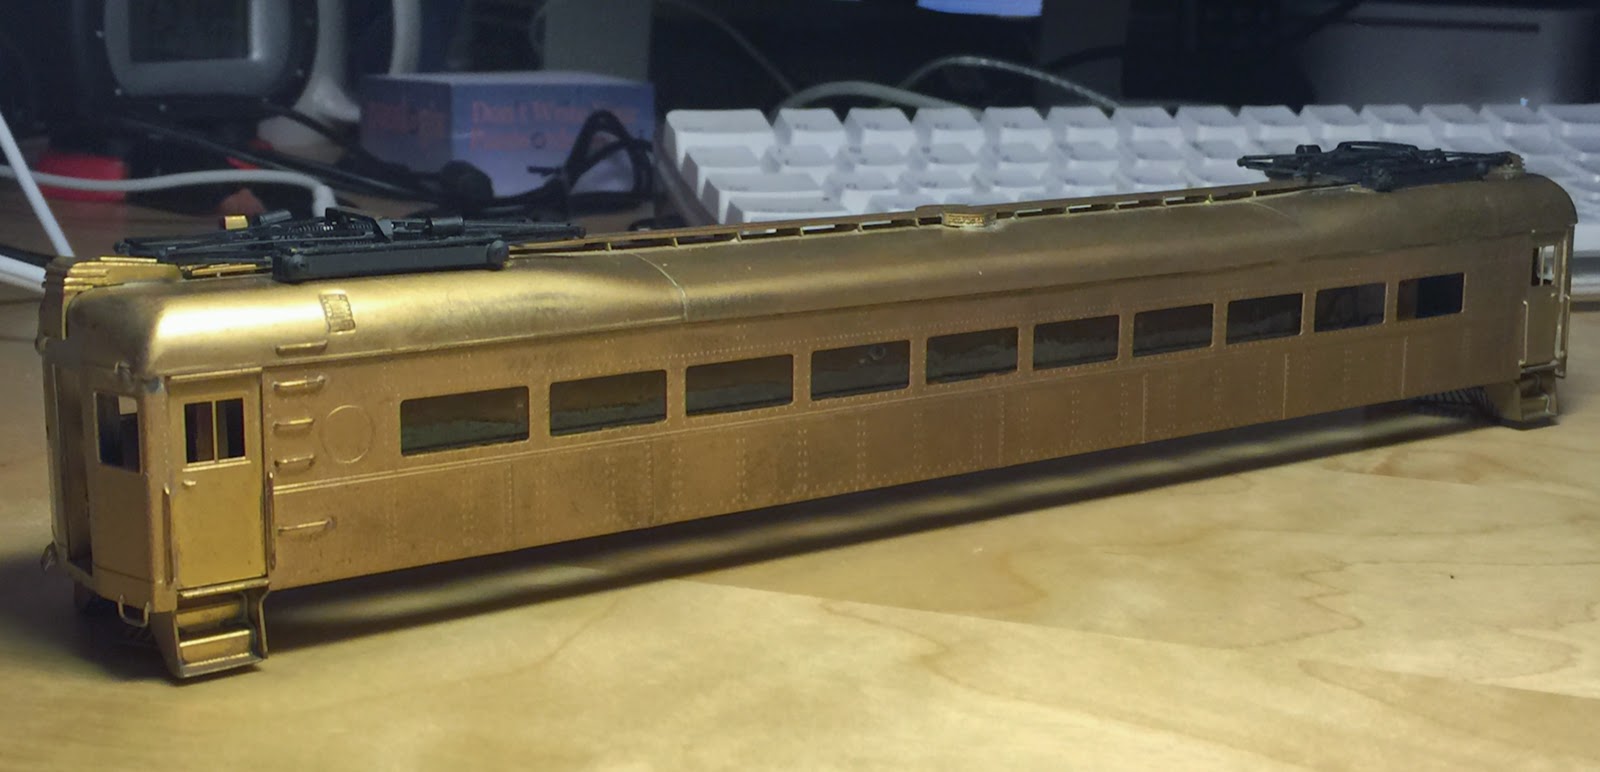
Oh, the (Grab) Irony: Island Model Works South Shore Car Project Update
Another busy Autumn with lots of work and fun travel slowed--but didn't stop!--progress on the IMW South Shore car build. Check out some grab iron and railings that recently went on the car:
I used a 2mm detail removal chisel from Micro Mark to remove the original molded-on grab iron and railing detail. While there was still a shadow of the original details remaining on the model, I marked the holes for drilling with an awl to eliminate any guesswork about where to drill and mount the new railings. Sanding sticks were used to finish and smooth out locations. Masking tap over the corrugations/flutes on the side protected those details from getting scraped or sanded off
For the end grabs, I could have used some pre-formed wire grabs but I wanted to try something new and craftsmanlike, so bent I my own end grabs and railings using .015 brass wire and Micro Mark's Grab Iron Bending Gauge. (Yeah, I went on a little Micro Mark buying frenzy, which is easy to do when you're out on the road, late at night in a hotel thinking about model railroading and you have a good, reliable Internet connection . . .) Takes a little practice, but that gauge let's you make uniformly shaped grab irons of pretty much any size.
The grabs and railings are press-fitted in for the moment, because there will be some more rough handling as I fit the window glazing, drill out and fit lenses for the headlights and marker lights, and I add final details such as windshield wipers and ditch lights. I also anticipate employing a plastic modeling technique to prep this model for final painting, which is to use a special primer called surfacer to find, fill, and sand any flaws--thus my avoidance of actually attaching many of the smaller details such as horns, bells, grabs, etc.
Meanwhile, another one of these IMW South Shore kits has found its way on to my workbench, along with another Walthers RDC drive. The second time around ought to be easier (and better).
 |
| The end grabs and entrance door railings are press fittted in for easy removal, as this car will get some serious manhandling when the lenses and glazing are installed. |
For the end grabs, I could have used some pre-formed wire grabs but I wanted to try something new and craftsmanlike, so bent I my own end grabs and railings using .015 brass wire and Micro Mark's Grab Iron Bending Gauge. (Yeah, I went on a little Micro Mark buying frenzy, which is easy to do when you're out on the road, late at night in a hotel thinking about model railroading and you have a good, reliable Internet connection . . .) Takes a little practice, but that gauge let's you make uniformly shaped grab irons of pretty much any size.
 |
| Expensive but worth it: Micro Mark wire bending gauge (top) and 2mm chisel |
Meanwhile, another one of these IMW South Shore kits has found its way on to my workbench, along with another Walthers RDC drive. The second time around ought to be easier (and better).
Subscribe to:
Posts (Atom)